How to Take Great Portraits with One Flash
Although I always bring a whole bag, well, really a few bags full of flashes of all sizes and powers, many times I find that using one flash is an easy way to get the right lighting while still being flexible enough to follow the subject and make corrections quickly.
I recently shot a senior portrait session with a variety of lighting setups. I always try to be flexible and give lots of options in terms of lighting, background, and ‘looks’. While I am always working towards a thought out end photo, I will happily stray from that as light allows, or when things come up during the shoot, which they always do. As we went through the shoot, I was moving back and forth from flash to available to bounce and all combinations of the two. On these wide ranging shoots, I find that working with the different combinations of lighting helps me keep fresh perspective throughout the shoot. Each small change of lighting can lead to a new idea.

For this setup I was using a Nikon SB-800 Speedlight with a 24″ softbox and a 48″ circular reflector with the gold side bouncing a bit of warmth back on the subject and filling in the deep shadows. The SB-800 was triggered by radio. I do use Nikon’s iTTL with commander and remote flashes, but for this set up I was moving back and forth, changing cameras and lenses and needed to be sure the flash would be triggered. The bright sun has played tricks on the communication between commander and remote flashes in the past, meaning you need a pretty direct line of sight between the two. So for this I did do some minor tweaks to the flash, set in manual mode, increasing or decreasing the power as needed. Yes, it’s an extra trip to the flash, but we were moving around quite a bit and it didn’t seem to break up the flow too much. The movement and small break in shooting will also give the subject a little space to catch their breath before getting back into it. I find that with professional models you can get away with more sustained shooting, but with amateurs a little break is always helpful, if only for a few seconds.

The Nikon SB-800 had the dome diffuser off, but the wide angle flap down. I generally use the dome diffuser to give a slightly softer light through the softbox, but due to the intense sun I needed that extra bit of power that the dome diffuser takes away. I was running the SB-800 between 1/4 and full power. Having blown a few SB-800’s running on full power in the past, I generally try not to use it too much, but if I have to, I try and slow my shooting down to allow the flash to safely recycle without frying. The amount of ambient light and strength of the sun also kept me using the SB-800 instead of my SB-900 which will shut down if it starts overheating. Yes, it saves the flash, but a flash that stops working mid-shoot, while under normal circumstances is frustrating. I’ve heard good things about the SB-910’s thermal shutoff. Hopefully they have extended the range of heat allowed, or figured out a way to get rid of the heat more efficiently.

I could have just as easily used a battery powered monolight such as my SP-Systems Lancerlight 160 or an Elinchrome Ranger. I choose to use a smaller flash only for ease of movement. The larger monolights are just that, larger, so if you’re running around moving the light every few exposures, having the small flash helps keep the hassle to a minimum.
How to take great photos with studio and small flashes

(Wedding dress model lit with one flash. SP-Systems Excalibur 3200 flash with a 32" octagonal softbox, camera right. Nikon 17-35mm 2.8, Nikon D2x. The shutter was fast enough to eliminate the ambient light, creating the deep shadows and dramatic lighting.)

(Doctor and patient with MRI machine. Multiple flashes light this scene. Two Nikon SB-800 Speedlights provide the purple to light the foreground. A SP-Systems monolight with a hex-grid camera left adds a little pop. A SP-Systems Excalibur 3200 with umbrella, camera right, fills in her back, the wall and gives a little rim light on her hair. A SP-Systems Excalibur 3200 soft box camera left lights her face. Triggered with a combination of radio and light slaves. Nikon D2x, 17-35mm 2.8.)

(Model lit with one flash. Balancing the ambient light with the flash (off to camera left). Both the model and I were on helper's shoulders to get the right perspective and include the amazing frozen chandelier. Monolight flash with softbox, Nikon D2x, Nikon 50mm 1.8.)

(Models standing in a river, lit with one flash. One flash, SP-Systems Excalibur 160 with battery pack and umbrella, camera left. Triggered with a radio trigger. Nikon D2x, Nikon 70-200mm 2.8. Moments later the umbrella caught a tiny gust of wind and fell into the river! Note to self only use an umbrella outside with someone holding it. Not to worry, after a thorough drying, I still use the flash to this day.)
How to take great photos of a ballerina in the studio
After getting some awesome photos of Sarah dancing at sunset on Lake Champlain, we met back up at the studio to create some abstract, clean and simple photos to complement the dramatic outdoor ones.
We started on a “fashion gray” backdrop, but when I looked at the camera, all I wanted was a nice clean black backdrop to keep the focus on Sarah dancing. After I switched backgrounds, the photos started to look better. I was using an extremely simple one and two light set up. The two lights I used were both SP-Systems, 3200 Excalibur. Both lights had softboxes on them, one using a 2’x3′ softbox, the other a 36″ hexagonal softbox.
I was looking for soft, directional light. I tried to eliminated any unwanted light bouncing back into the scene by putting up a black muslin backdrop blocking a white wall on one side (the other side I would just have to deal with what came bouncing back).
Most of the lighting was aggressively side lit. I was attempting to get high contrast, good definition along the edges, and good fall off of the light as it wrapped around her. The lights were placed between 70-90 degrees from the camera. Enough to get the edge lit, but with a little spilling over the front of Sarah to get some definition.
The lights were triggered with a radio slave.
Shooting black on black can cause a few issues, namely in post production trying to separate the two, but it’s easily overcome with a little selective burning.
When the aim is to take abstract photos, I generally try and look for slices of a whole shot. I try and focus of the curves and angles of the arms, legs, whatever makes interesting angles. Then I shoot and shoot. Changing things up as much as possible. I found myself moving the lights just a hair forward and backward as I would lose Sarah in deep shadow, or get her too evenly lit.
Even with an ‘easy’ shoot and setup, it’s always challenging to get the right shot.

We started with a simple pose, one light, grey background.
Nikon D2x, 17-35, f6.3, iso 100, one studio flash, soft box

Nikon D2x, 17-35, f6.3, iso 100, two studio flashes, soft boxes

Nikon D2x, 17-35, f6.3, iso 100, two studio flashes, soft boxes

Nikon D2x, 17-35, f6.3, iso 100, two studio flashes, soft boxes

Here’s a quick shot of the setup. Very simple.

Nikon D2x, 50mm, f5.6, iso 100, one studio flash, soft box

Nikon D2x, 50mm, f5.6, iso 100, two studio flashes, soft boxes

Nikon D2x, 50mm, f5.6, iso 100, two studio flashes, soft boxes
Let me know what you think.
More to come…
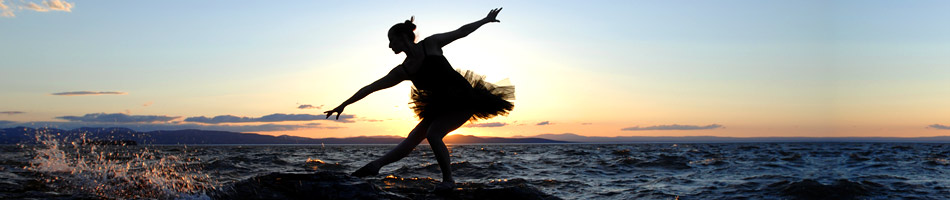
How to take great photos of a ballerina at sunset
I had the wonderful opportunity to photograph ballet dancer Sarah Steward dancing along the shores of Lake Champlain the other day. After the crazy rain we’ve been having, the skies cleared and a magnificent sunset gave us just the backdrop we were looking for. The balmy weather quickly changed to strong winds and 38 degree water soaking us, but I think the results are worth the temporary discomfort.
As always, all the photos are available for sale as prints or digital stock here.
The setup for these photos is fairly simple. The main shot we were looking for was a silhouette of her dancing with Lake Champlain and the Adirondack mountains in the background at sunset.
The main thing about shooting silhouettes is to watch out for lens flare. It can sometimes look nice to incorporate the lens flare into the shot, but I was looking for a clean silhouette and the less flare the better.
Lens flare is from unwanted light striking the lens glass. It manifests itself in two basic forms, a haze that can wash out the deep shadows of a silhouette, and dots of rings of light coming from the direction of the light source. If you’re shooting directly into the sun or another light source, there’s really nothing you can do about it, but if the light is just out of frame, you can shade the lens to reduce the flare.
Using the lens hood is a good place to start. I had my assistant holding a reflector just over the end of my lens to cast a shadow on my lens and cut out the flare.
All of these photos were shot with Nikon’s D2x camera with it’s ISO set to 100. The D2x may not have the most sensitive sensor, but at 100 ISO it produces some of the smoothest and best files I’ve seen out of any current digital camera.

Nikon D2x, 50mm, f1.8, 1/2500 sec

Nikon D2x, 50mm, f7.1, 1/1250 sec

Nikon D2x, 17-35, f7.1, 1/180 sec

Nikon D2x, 17-35, f5.6, 1/500 sec

Nikon D2x, 17-35, f7.1, 1/500 sec

Nikon D2x, 17-35, f5.6, 1/500 sec

Nikon D2x, 17-35, f5.6, 1/500 sec

Nikon D2x, 17-35, f3.5, 1/100 sec, SB-900, 16″ softbox, radio transmitter
I decided to add a little light to really make things pop. I was using a Nikon SB-900 with a 16″x16″ softbox, camera left, tightly held by my assistant as the wind was really picking up. I would have used the Nikon i-TTL, but there was too much light, and the wind was really whipping, so I decided to trigger the flash with a radio transmitter to ensure it would fire each time. The flash was set to M 1/4 power.
I was trying to balance the ambient light with the flash. I had to keep the shutter speed below 1/160th for the radio transmitters, and wanted the sunset to be darked a bit more than the flashed area to get some real deep colors in the sky and mountains. The ambient it about 2 stops under normal exposure, and the flash is right on.

Nikon D2x, 17-35, f5, 1/100 sec, SB-900, 16″ softbox, radio transmitter

Nikon D2x, 17-35, f5, 1/100 sec, SB-900, 16″ softbox, radio transmitter
More to come.
How to Take Great Photos of a Violin
I recently had the opportunity to photograph some of luthier Jonathan Vacanti’s hand made violins. They are beautiful works of art. It’s great to see that true craft is still happening out there. Vacanti works at Vermont Violins, Burlington’s violin shop on Church St.
Product photography is much trickier than it seems. Photographing products means that you need to get perfect shots of the item. No glare, straight and sharp, great lighting, even background.
To shoot this hand made violin, I knew that the final product would be a violin floating on a black background. In the studio, I set up a black muslin background and blocked out the light from the window to make sure I was working in a darker environment. It can be difficult to get a true black right in the camera while keeping the rest of the image properly exposed. My goal was to get the background as black as possible before heading into post production in Photoshop.
To get the violin to ‘stand up’ with the least amount of movement, interference with the lighting, and least amount of post time, we hung the violin on fishing line between two light stands. Thankfully the violins are extremely light and didn’t need much support, but we made sure that there was something close by underneath, just in case it decided to jump off the line.
As far as lighting, I chose to use two soft boxes on SP-Excalibur studio flashes, triggered by a wireless transmitter. I wanted to keep the lighting fairly even, adding just a bit of depth and a little highlight on the edges.
The lights are set up at a 45 degree angle camera left, and about a 120 degree angle camera right. This made my key light the one on the left, and I used to the right one for extra fill and to highlight the edge. I did have to slightly adjust the lighting to keep the glare on these shiny instruments to a minimum.
I used two black flags (actually foam core covered with black paper) to keep the light from spilling backwards from the left light and towards the camera from the right light.
These were all shot with a Nikon D2x, 50mm 1.8, around f7.1 at ISO100. I love how creamy and smooth the Nikon D2x’s files are. Having a starting point of such a low ISO, there just aren’t any chunky pixels to deal with, just smooth transitions from light to dark.
After shooting, I went into Photoshop and removed the fishing line and made sure the background was actually black and not just dark.


Best Photos of 2010 – Revisit last year’s highlights
Now that 2011 is here, I thought I’d quickly revisit 2010 before getting to the business at hand.
Although at times I would like to forget 2010, there were more than a few highlights. I had some amazing travel opportunities, ridiculous adventures, and some serious photo-making. Here are a few of the shots that stand out from my year. As with my photography, there are lots of locations, people, and subjects. I like to mix it up. Shooting the same thing day in and day out would drive me crazy.

After having one of craziest adventures of my life (read about it here) and getting lost in the Cambodian jungle, Alan and I rang in the New Year by taking another motorcycle trip down to Kep on Cambodia‘s southern coast on the Gulf of Thailand. There’s no better place to eat fresh crab in a hammock.
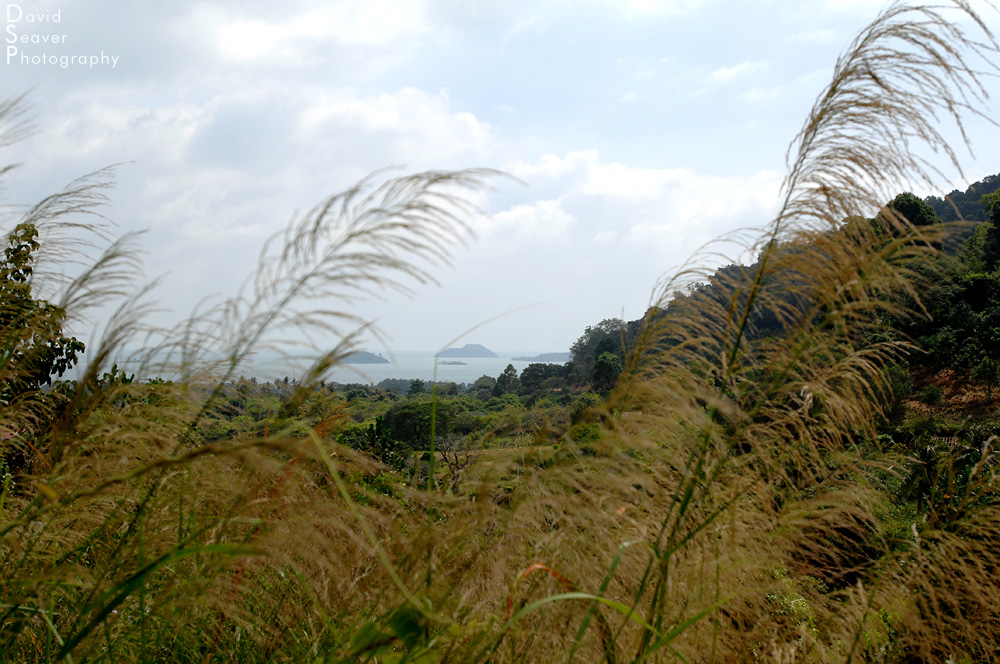
View of Kep from up the hill.

On the way back from Asia, I spent a few uneventful days in sweaty Singapore, but fell in love with their amazing botanical gardens.

Carp swimming in Singapore.

Back in wintery Vermont, mother nature only graced us with a few hits of snow, but we made the most of it.

Miriam getting some air in Stowe.

The hike down from Camel’s Hump.

That’s me with the camera. Yes, winter is my favorite season. Nothing brings a smile to my face like big flakes silently making their way to the ground.

A quick trip to the Turks and Caicos to shoot a lovely wedding helped to break up the lack of snow.

Rum punch on the beach in Turks and Caicos.

Back in Vermont and more health care photography for CAP Today.

As some of you know, I shoot a lot for Fletcher Allen Health Care, Vermont’s premier hospital. Surgery has always been a favorite subject of mine, and I jump at any opportunity to get back into the OR.

Another shoot for Fletcher Allen brought me into the neonatal intensive care unit.

Vermont’s famous Bread and Puppet Theatre.

4th of July fireworks over Burlington. Shot from Oakledge Park.

A night I will never forget. Lightning bugs put on a spectacular show for a group of visiting Russians from Burlington’s sister city, Yaroslavl.

Within the Vermont wedding scene there is really only one magazine, Vermont Vows. Of the thousands and thousands of photos I shot for them last year, I’ll show you three. If you want to see more, pick up a copy at any local store that sells magazines.


Photographer’s note: There are two lights on these yummy cupcakes, one from a studio flash with a softbox up front right, the other from a Nikon SB-800 crammed behind the old postal shelf.

A visitor to my studio.

Have I mentioned that I love macro photography.

A kindred spirit was lost this summer. Never have I felt a connection like I did with Rama, we spoke the same language. He is missed.

It was the summer of Candy Kate’s amazing marshmallows. Anyone who hasn’t tried them, must. They will change your life.

An oil spill to cripple the gulf, check. Read more about my experience of witnessing the BP Oil Spill. A dolphin swims precariously close to large swaths of thick oil. Oil rigs can be seen in the distance.

This slick was shot within minutes of the dolphin above.


I will reiterate that it’s time for a change. A change away from oil and all the nasty side-effects that come with it.

Back in VT and it’s portrait time!

Everything looks great up close.

There was family time with sister Abigail and nephew Birch.

The Tap Kids came to town to work on their fancy footwork.

While Miriam and I had our own respective adventures this year, (check out her blog on Guatemala, life, and everything else), we had some memorable days.

Contemplating the Ultimate Answer to the Ultimate Question of Life, The Universe, and Everything…I think it’s 42.

Bread and Puppet’s giant head.

Fun with flashes, Red Rocks Beach.

Church St was rocked, and I mean rocked by Grace Potter and the Nocturnals this summer. It’s great to see hometown people making it big.

For those of you who may have missed the Halloween party this year, fear not, there are a few photos to provide a reminder of the insanity.


No year would be complete without some ridiculous trip to some far away land. Trans-Siberian Railroad, of course. Why not?! This photo is the inside of Kazakhstan’s Baiterek Tower in Astana.

As we roll into 2011, let us not forget the highs of yester-year and push past the lows. It’s a new year and there’s fresh snow on the ground. Things are looking up.
Stay tuned for updates from 2011.
How to Take Great Travel Photos
Great travel photos are all about being in the right place at the right time. Does that mean it’s all luck. No way. You can ‘create good luck’ but doing a little research, talking to people, and generally saying YES to opportunities.
I love travel photography. It’s what pushed me towards pursuing photography (instead of silversmithing, which I was intensely studying), it has been the driving force in my professional life, and it acts as a rejuvenating activity to keep me fresh creatively.
Travel photography makes you think fast, observe closely, and generally helps to push you out of your comfort zone. When you only have one chance to get the shot, it should make you think just a bit more about the kinds of photos you want to create. When you are seeing things for the first time, you have the perfect opportunity to capture them in a creative way.

Nikon F100, 70-200, f3.2, Fuji Velvia 50, b&w processed in Photoshop
While riding around the countryside outside Kep, Cambodia on the back of my friend/fixer Rya’s rented moped, we had stopped so I could photograph the landscape, verdant green rice paddies leading up to dark green mountains. After a few minutes this old man came walking down the road. He was a 72 year old rice farmer that had survived the Khmer Rouge and the civil war in previous decades and was happy to chat and be photographed.
The light was hard from a late afternoon sun, but there was enough bounce from the light red dirt road we were standing on to not give super deep shadows. Although I shot a number of different angles of this man, I like the shallow depth of field keeping the focu on his weathered, kind face.
While traveling may begin as a search for place, it ultimately ends up being about people.

Nikon F100, 50, f4, Fuji Provia 100
Before children were to put on a traditional Khmer dances, there were filling a school room getting ready. It was slightly chaotic with kids running around, so I looked for interesting moments I could focus on to calm the scene.
When the action starts I find myself on auto-pilot, shooting instinctively, flowing really well. It’s these moments that I strive for, a photo-zen.

Nikon D2X, 17-35, f7.1, 30secs
As the chaos of the annual water festival swirled around town, I worked my way down the river, grabbing shots where I could. It was a sea of humanity, many sending floating candle boats down the river. From one of the bridges I made this long exposure of the candles blurring as they make their way down stream. I wasn’t carrying my tripod, so the camera is resting on the edge of the bridge, triggered by the self timer. I definitely had one hand on the neck strap, in case the camera decided to jump off the edge.
Traveling to countries while they’re having annual celebrations is an easy way to soak up the local culture and there are photo opportunities everywhere.

Nikon F100, 24-120, f5.6, Fuji Velvia 50
Traveling presents encounters that you don’t get in your normal life.
After driving all day through overcast skies, we reached our destination for the night, Oggi Noor Lake. We were sitting in our SUV, mustering up the energy to set up camp, when the sun dropped below the clouds and bathed everything in it’s golden light. I jumped out of the SUV and started shooting when I noticed a group of teenage boys on horseback on the beach below me. They saw me and waved me down. I clamored down to them. They were very excited and offered me a drink of vodka. After a few minutes of hand gestures we all made our way back up to where the others were. I shot a bunch of group photos and a few portraits before they headed off in different directions. In a few minutes, what had been a drab day turned into the best light I saw the whole trip.

Nikon F100, 70-200, f2.8, Fuji Velvia 50
After the young Mongolian riders left, I captured this shot that I think sums up Mongolia the best and has been a favorite of mine over the years.

Nikon F100, 24-120, f4.5, Fuji Provia 100
This was a grab shot while meandering through the Summer Palace in Beijing, China. It was tough shooting with the bright smoggy haze that blanketed the city. The city was hot, in late summer. Shooting in touristy places like the Summer Palace, it’s sometimes hard to find new and engaging images that haven’t been taken a billion times before. This image came about as I was shooting the pond of lilies behind her. She sat down and started fussing with her hat. I made a few frames before the crowds overtook me and I moved on.

Nikon F100, 24-120, f5.6, Fuji Provia 100
Getting lost is part of traveling.
If your aim is to get lost, are you really lost?

Nikon F100, 24-120, Fuji Provia 400
While in the process of documenting the small Muslim community in predominately Buddhist Cambodia’s city of Siem Reap, we were invited to join some of the community for a Ramadan meal. It was just after the time the USA was entering the war in Afghanistan and it was unclear how they would receive us. As with most people I meet traveling, they were exceptionally welcoming. I made this shot of an old man tentatively watching us from across the mosque, through a railing.
When I’m shooting I always look for things that can go in the foreground of a photo. I want to give depth and a sense of scale, add a bit of color, or just add a little framing. I couldn’t see over the railing, so shooting through it made more sense. You have to work with what you have.

Nikon D2H, 50mm, f4.5
If you really want the shot you might have to put up with some little annoyances.
The flies in Lake Mungo, Australia are persistent little buggers. You have about a minute from exiting the confines of your car until they cover you…or at least they covered me. I could barely handle it.

Nikon D2H, 24-120, f4.5
Forcing myself to not freak out over the flies rewarded me with this ridiculous landscape of one of Lake Mungo’s sand dunes with an impending rain storm that almost trapped us in the outback.
The weather can change in seconds. Those times can present stunning landscapes and colors. You may have to run for cover in a few minutes, but the leading edge of storms is a beautiful thing. Dark skies can also help to bring out the colors of the landscape.

Nikon D2X, 7mm, f1
There are times when you just get a feeling about which lens to use and how to shoot a space. When you’re in the golden orb at the top of the Bayterek Tower in the new section of Astana, Kazakhstan the time is right to pull out the fisheye. While I think that fisheye shots can be gimmicky, there is a time and place for every lens.
The need to keep changing things up when you’re shooting is key. Along with the fisheye photos, I also shot with a telephoto lens and a normal wide angle. This gave a whole range of images to work from. Knowing that I wouldn’t be back to this place again on our trip, I made a point of a taking a few extra minutes and making a few extra frames.
Take the time to stop and look around.
Packing the gear bag for the day in an unknown city is a tough exercise in preparedness, economy, and guessing. You want access to all your gear, but you don’t want to lug it around day and night. What I bring depends on if there’s a car involved or if I’ll be hoofing it all day. This day in Astana we weren’t doing too much walking, but we were still moving around too much for my huge backpack. I used a medium sized shoulder bag, carrying two Nikon D2X’s, 70-200mm, 17-35mm, 50mm, and 7mm lens, one SB-800 flash, and an extra layer of clothing. It sounds like a lot, and it is, but when creating images is what you do, you drag that bag around until your sore and tired.
I love all my gear, but there are days when it’s good to go super light, back to basics, one camera one lens. I usually go for the 50mm. Forcing yourself to work in that limited frame will get you thinking about your photos and lead to more creative shots. Going back to basics is a good thing to do, revisit what you know, push the boundaries a bit. One camera one lens, especially a prime lens forces you to move your feet, changing your angle and giving you a new perspective. Zoom lenses are wonderful, but nothing beats moving your feet.
Taking great photos is about patience when you’re waiting for the shot, then hustling to work the moment until it’s gone. Setting yourself up for shots is as easy as paying attention to your surroundings. If you see something that works well as the background, be patient and wait for something to come in front of it. Something invariably will. Pay attention to weather and lighting, sunrise and sunset times and put yourself in places to make the most of each. Some places that are ‘known’ for sunset might be just as stunning at sunrise without all the crowds.

Nikon F100, 24-120, Fuji Velvia 50, SB-80 Flash, tripod
This shot was made just after sunset at Phnom Bakheng temple, overlooking Angkor Wat, in Cambodia. The camera is on a tripod, the flash is being triggered manually from inside the temple. The exposure is a few seconds. While making this photo we were already being hustled out by the guards before nightfall. You can always get a few minutes out of guards by being nice, starting to chat with them, and generally being polite. You’ll eventually have to leave anyways, and who knows, they might give you a private tour or show you some special place off the beaten track.
An interested, kind smile is your best currency when traveling, it is universally accepted and sometimes priceless.

Nikon D2X, 17-35mm, f18, 9 seconds
Try and get to places where you can have a view. This time lapse of the Bangkok, Thailand streets at night is from one of the many concrete pedestrian overpasses that are ubiquitous to South East Asia’s crowded cities. I wasn’t carrying a tripod, so I just rested the camera on the railing. It’s pretty hard to keep a camera still for 9 seconds, so find places to prop your camera. Time lapses are great for showing movement within a space. Is there crazy traffic? Are the crowds overwhelming? Go for the long exposure to convey the movement.

Nikon D2X, 17-35mm, f2.8
Follow your nose (and other senses) to take great travel photos. Street food is an amazing thing. Cheap, easy, and delicious. The best part is that people congregate near food, there’s usually lots of good color, and interesting moments to capture. And afterwards (or before) can you eat some interesting food! Ordering food or a drink from street vendors is a great way to break the ice and get you on a good foot for when you go back and ask to take photos of them.
When I’m traveling, it’s very apparent that I’m not your normal tourist taking little snapshots. When you bring out the big cameras people notice. Most people are very open to having their photos taken and I try and ask people if it’s okay before I get to it. If someone says no, then I just thank them and move on.

Nikon D2X, 17-35mm, f2.8
Traveling will surprise you.
Ok, so this isn’t a great photo, but it comes with a crazy travel story about getting lost in the Cambodian jungle on motorcycles. There are stories behind every photo.
How to frame and compose great photos
Great photography isn’t about what kind of camera gear you’re using. It isn’t about the mega pixel count. Great photographers can take great photos with any camera. I don’t think people are too concerned with the kind of camera Henri Cartier-Bresson used, and I’m sure someone like Joe McNally could bring home a winner with a simple point and shoot. A good example is Damon Winter’s photos of life in Afghanistan on his iPhone. That being said, I do love my pro DSLRs and the wonder of Nikon’s top-shelf glass in their lenses, but that’s besides the point. We’re talking about composition.
Great photos are all about composition, light and moment. In three earlier posts I talked a little about basic lighting, covering availablelight, flash, and mixing the two. In this post I’ll write a little about the importance of composition in a photograph and some easy tips on how to frame an interesting photograph.
Anyone can point a camera at something and press the button. It’s the people who look at that same thing and slightly alter the composition, making a striking photograph instead of a forgetful one.
That little box that is your viewfinder seems like a simple way to look at the world, but as you move it around viewing the scene slowly, adding some elements and subtracting others, it becomes clear that composing an interesting photo is a challenge that never ends. In school I was taught to constantly and obsessively pay attention to the edge of the frame. What makes it in and what doesn’t. Is something cut off by the edge, is it too centered, how much space do you leave around a subject and in what relation to the edge do you put it. How does the eye move around your composition.
Yes, you can crop things after the fact, but who wants to sit in Photoshop making simple adjustments that should happen in the camera. I’ve always advocated doing as many things in camera as possible, including lighting, moving details, framing, among other things, but I’ll write more about that some other day.
Back to framing a photograph. To start with, stick your eye to your camera and look around. Make sure you can see the edges of the frame. As you’re about to take a photo, look around the edges and see if anything is amiss. Is your model’s hand cut off? Is that group missing a few feet at the bottom? Too much space about someone’s head? Is everything looking too centered?
There is a push and pull between the edge of the frame and subject. The best photos are often the ones where the subject is off-center, creating a visual interplay with the open space on the other side of the photograph. Sometimes centering the subject will create a great photo, but generally you should be thinking of putting emphasis on the ‘thirds’ of the photo. If you break up a frame into thirds, both horizontally and vertically, where the lines intersect are strong visual points. That’s where you should be aiming to put your subjects. I’m not saying don’t snap a photo of the centered version as well, but start by placing your subject in those thirds and you’ll immediately get people commenting on your photos.

Just by simply moving your subject off center will help to create more visual tension and add some life to your photo. Obviously there are many instances when you don’t want to put something off center, but by adding this simple technique to your repertoire, you will start to see the world in a different way. So glue your eye to your camera and start moving it around. Practice by finding a simple subject, and take two photos (or two hundred), one centered, one off center and see which has more power visually.
There’s a reason why cameras have their focus points around the sweet spots of the thirds. If you shoot a lot of action or you like to use continuous focus, you can set up your framing so that you set your focus of one of those intersections and voila – an interesting photo.
Let’s take a look at a few examples.

Nikon D2x, 17-35mm, f3.5, SB-800 bouncing off ceiling
This was a quick grab shot of a bride’s maid at a recent wedding I shot. She was peaking around the door watching the bride get her makeup ready. The mood was light and everyone was in a good mood. I only got off one frame and had only a second to frame it, but as soon as I turned around I knew I wanted her hard to the right, leaving the open green of the hall wall to fade off to the left. If I had centered her, the door jam would have become a much stronger element of the photo when I wanted to keep it focused on the woman.

Nikon D2x, 70-200mm, f3.5
Here’s another wedding photo that I think illustrates the point of placing your subjects off center to add some depth and visual energy to the photo. Keeping them off to the sides lets your eye follow the mowing lines in the grass right up to them.
Of course, as they took this little stroll, I fired off about a hundred other shots of them, always trying to mix it up, move them around in the frame, working the depth of field, switching to a wider lens, basically everything I could think of to keep it interesting.
Anyone who thinks that cameras capture the world exactly as it is should think about this. With every photo that I take, I make decisions about what/who makes it in, and who gets left out of the frame. Some of the photos that have the calmest look, can actually be bits of a larger scene that might be total chaos, but left out of the photo. Each photo is filtered through the photographer’s eyes and cropped the way they see fit. Do you include the pile of trash next to an otherwise beautiful landscape? My answer is generally to make more than one photo, some of just the landscape, and some with that big, stinking pile of trash in one of my frame’s sweet spots, showing there’s always a story behind a photo.

Nikon D2x, 50mm, f2
Working with depth of field is an easy way to use composition to your advantage. With this photo of a newborn in the intensive care unit, I used a shallow depth of field to isolate the baby’s tiny fingers and hand. I placed the hand in the bottom third of the frame, allowing the out of focus ear and head to take up the top half. Instead of centering the hand, I chose to keep the photo simple and concentrate on two aspects, the hand and the head.

Nikon D2x, 17-35mm, f5.6
Working with what was in front of me determined how far I pushed this guard off center. After taking a few shots of the overall scene, (there’s a flame off camera left), I thought that by letting the vast expanse of the Kremlin wall take up a majority of the frame it would give a sense of scale to the photo. I would have gone wider, but there was distracting shrubbery off to the right.

Nikon D2x, 70-200mm, f4
Another quick grab shot of this woman talking on her phone in Moscow’s Red Square. By placing her off center it adds visual weight, showing a connection to St. Basil’s Cathedral in the background.
Framing is something that is a constant challenge for photographers. I know that I when I start to get tired, my compositions tend to lack that something extra. It takes mental energy to be constantly composing the world around you into a rectangular space. It’s why photographers can always take a better photo. Or at the very least, they can continue to try and create a better photo.
So take those extra seconds to really look through your viewfinder, scan the edge of your frame, and move the camera around.
To see more of my work or to contact me about a project or assignment, please visit my website, www.photovt.com.
Mixing flash and available light
In the last two posts I’ve talked about shooting is only available light, and shooting with total control of all the lighting (i.e. in studio). In this post I’ll talk a little about mixing flash and available light. When working on location, as I do 90% of the time, there’s a good chance that you’ll have to mix some flash with available light to create the right feel and make your photo pop. This can be done with small flashes, they’re even easier now that wireless TTL works so well. They can also be done with big studio lights, assuming you either have power or a battery pack.
Let’s look at some examples.

Nikon D2x, 50mm, f1.8, Nikon SB-800
This portrait was made with the sun streaming in through the golden fall leaves. Instead of doing this in the full sun, or the full shade, I found a little spot where a bit of the sun was sneaking through while lighting up the leaves. I placed the subject so her head would be highlighted by the sun, then held an SB-800 at arms length to camera left. The flash was zoomed in to it’s max, 105mm, to keep the flash tight and only on her face. I was shooting wide open at f1.8 to get that great short depth of field of prime lenses. While you can still tell there’s a flash being used, I tried to keep it subtle so it would blend well with the available light.

Nikon D2x, 50mm, f5.6, Excalibur Flash, reflector
Here were were during an all day photo shoot out in the sun around midday, trying for things not to look to blown out. Without any additional light, her hat was creating a huge shadow that engulfed her head. I added in a flash, camera left with an umbrella to soften the shadows and give a little pop. I was mixing that with a gold reflector that was lower down on the ground angled back towards her face and chest. Without the flash, the gold reflector was a little too gold. In bright sun they are incredibly reflective, be careful not to blind your subject. By keeping both the flash and reflector of center it added a little depth and definition to her face and gave a little twinkle to her eyes.

Nikon D2x, 70-200mm, f5, Excalibur Flash
Another shoot for Vermont Vows, we were set up in a dark river with trees all around. The sky was a bright but cloudy day. I added a light, a battery powered flash off to camera left with an umbrella. It succeeded in bringing some pop to the photo and giving a little more contrast to their faces, which were fairly flat otherwise. The problem with using umbrellas outside however is that they are prone to catching wind and the slightest breeze caught mine and sent it tumbling into the river a few frames later. After a thorough drying, the flash showed no signs of problems and I’m still using it 4 years later!
The trick with mixing flash and available light is to not let one overpower the other. If I had sped up the shutter a little more the background would have become a black hole. The idea is use flash, but to basically hide it from the viewer.

Nikon D2x, 17-35mm, f3.2, 2 SB-800’s
As the sun set quickly there was no way to hide using the flash, but with a sky like that, I think it’s ok. I had two SB-800’s, one on camera and one camera left with an umbrella (this time with someone holding it). The main flash was powered down somewhat so that it’s wireless TTL triggered the off camera flash, but didn’t add too much light to the photo. With the fading ambient light, it was a constant balancing act to keep the flash just a tad over the background, ensuring a little pop, and to deepen the sky just a bit. With animals, there’s always a need to keep the shutter speed pretty high to freeze them, and this little guy was no different.
To see more of my work or to contact me about a project or assignment, please visit my website, www.photovt.com.
Controlled and Studio Lighting
When you can control the lighting, you can control exactly how a photo will look and make minor adjustments all in the comfort of your studio, or wherever you’re shooting. While studio lighting is an endless experiment with endless variations, I’m going talk generally about the thought process.
Coming into a space that you will fully light, you have to think in terms of key lighting (main lights), background lighting, and highlights. You can control lighting with one light or a hundred. Each light adds a layer that you need to think about it’s direction, intensity, and shape (you can add color as well).
I won’t get too specific with which types of lights you can use. I use a mix of small flashes and large studio flashes depending on the location, subject, and how much I can carry to a shoot.
Let’s start with a simple one light studio setup.

Nikon D2X, 6omm, f20, 1 Nikon SB-800 no diffusion
This spider plant hangs over my desk and during a tremendous growth spurt last year was flowering like crazy. I taped some blue paper on the wall behind it, grabbed my SB-800 flash, tethered with a TTL cord, camera right and blasted away. It was challenging to get the light to only hit the flower and not the background. I ended up zooming the flash head to it’s max, 105mm. I had to shoot at f20 to get even a little bit of depth because the flower was so small and I was right up on it with my 60mm macro.
The whole thing about lighting is to make it look ‘real’ or believable, which generally means getting the flash off the camera to add depth and definition to the subject.

Nikon D2x, 70-200mm, f3.5, Excalibur 1600 with white umbrella
Although not in a studio, I had to take control of the lighting in this florescent lit basement laboratory. Nobody wants a dark green cast over your photos from the standard florescent tubes in most buildings these days. I set up an Excalibur 1600 Studio Flash with a large white umbrella to camera left, triggered by a radio slave. Shooting at 100/sec was enough to overpower the ambient light of the lab, eliminating the green glow, and giving me just enough light that I could still go as open as f3.5 to keep a reduced depth of field. I was trying to get something in the foreground and we had tried a number setups with various lab equipment, but here I’m shooting through a shelf that separated the room. I had to stand on a stool to get up high enough to shoot through the hole in the shelf. The flash is on the same side as the subject as I didn’t want much light on my side to keep the focus of the Dr.
Now to add more lights. The more lights you add, the more complicated a shoot becomes. When I’m doing quick portraits, I like to keep it simple and use 1-3 lights, usually just one, off camera. However, some subjects call for more than one. 
Nikon D2x, 6omm, f5.6, three studio lights
This was shot for an article in Vermont Vows Magazine, the premier wedding mag here in Vermont. The setup was outside, but under a roof, but I wasn’t really looking for any ambient light, so I set up three studio lights, one on camera left with a large umbrella. From this angle it would be my ‘key’ light. I had two more lights, one on camera right with a softbox on it. That was creating the highlights on top of the flowers. The other was straight across from the first light, again with an umbrella, this time to light the back wall and fill in some shadows.

Nikon D2X, 17-35mm, f5.6, Excalibur 3200 Studio light
This shot was made with only one light, a studio light, camera right with an umbrella on it. While this section is about total light control in a studio sense, the only other light source was the monitors which I had to include in the photo, which meant that this image was made at 1/15 sec. While that’s pretty slow, it was dark enough that the flash would freeze any minor movement. On a side not about shooting at slow speeds, I find it’s all about controlling your breathing and steadying your body. If that fails, take as many photos as you can, one will end up sharp. I had brought and set up a few other lights, but once I got going, I realized that if I wanted a more dramatic shot of the doctor and patient, I should par it down to one light, not to mention the comparatively dim monitors that were being totally blown away by the flash. By moving the flash off to camera right, I could avoid getting reflections on the monitors, while lighting both subjects and giving the background just enough to tell that it was in a hospital.

Nikon D2x, 70-200mm, f3.2, Excalibur Studio Light
Here’s a simple one light set up, a large umbrella, 45 degrees camera left provides all the light you’ll need. Enough to pop the main subject, and giving just enough to light the background. You could also do this with two lights, one for the subject, one for the background, but this is the simplest way. With only one light you can keep those deep shadows on the non-lit side, giving enough light at the right angle to show real depth. I was also using a long lens to compress the depth of field and to blur out the background a bit.
To see more of my work or to contact me about a project or assignment, please visit my website, www.photovt.com.
Available lighting
In this post I’m going to talk a little about lighting and how it relates to taking great photos.
Lighting one of the big three that makes a photo great; lighting, composition, and subject matter. I’ll discuss each of these in other posts.
Photos need light. It’s what makes them a photo. In the old days it was a chemical process, now it’s a digital one, turning light into a photograph. Within lighting there are basically three options, natual/available, flash/controlled, and a combination of the two. We’ll start with the original light source, our sun. It’s big and bright and comes in an unending variety of colors and intensities depending on what’s diffusing or reflecting it. While direct sunlight has it’s place, and the golden hours around sunrise and sunset are a magical time, it can create blinding hot spots and black holes in your photos if you’re not careful. Cameras are not equipped to deal with the capturing the range from hot highlight to deep shadow. They’re much happier with either one of the other, which means moving your subject into some shade, or evening out the light a little bit. Yes, there’s the new craze of high dynamic range (HDR), but I’m a purist and think people take it too far and it ends up looking like a velvet painting. Used properly, there is a place for HDR, basically replacing filters of yester-year. However to get great photos, it’s easier to take a few seconds and think about what the lighting is, and how you want to use it, then to spend countless hours in Photoshop massaging a bad photo into a mediocre one. Let’s take a look at a few photos that give examples of different types of natural light.

Nikon F100, 50mm f5.6, Fuji Velvia Film
This boy was photographed just before a hazy sunset outside of Siem Reap, Cambodia. You can tell that the light is very low on the horizon and therefore very directional, leaving part of his body in shade. I had him turn slightly towards the sun so his face wouldn’t totally be in shadow and to give a little definition to his body and to pick up that golden light.

Nikon D2X, Nikon 50mm, f2.0
This photo of Amy Redford, film maker and daughter of Robert Redford, was shot under the eave of a porch to block out the harsh late afternoon sun. Although I did make some images of her in the direct sun, this setup worked best, with the soft light filtering in.
As a photographer, I’m always scanning my surroundings for proper lighting and background options. When shooting, I’m always aware of the direction and intensity of the available light as it determines what to do next. You can see in both of these shots that I have the subjects turned slightly from the light source to give more depth and definition to their faces.

Nikon D2X, Nikon 50mm, f1.8
This portrait was made in full shadow outside of my studio. After working with studio lights, I wanted to get some totally different lighting options, so we headed outside. With the soft even light when I’m out of the full sun, I like to shoot pretty wide open, softening the light even more.
When you’re shooting in available light, you really have to work with what you’ve got. You need to think outside the box and try create interesting vignettes. There’s always a little corner here or there with acceptable light. Work the light coming through a window or door, or if it’s bouncing off a white wall, even better.
To see more of my work or to contact me about a project or assignment, please visit my website, www.photovt.com.
Ice Hotel, Quebec Canada
This past weekend Miriam and I headed north to Quebec City and the Ice Hotel. I was last in the Ice Hotel in March of 2008 for a Vermont Vows photo shoot (possibly my favorite of the 100+ shoots I’ve done with them), but I’ve never spent any amount of time in Quebec City.
Aside from the incessant wind that brought the already chilly temperatures down to what even I would call ‘pretty cold’, we had a great time meandering our way through the Old City, stopping every so often for delicious food and the warmth of cafes.
Then it was off to the Ice Hotel. Winter is by far my favorite season and after being wowed by the Ice Hotel a few years ago, I’ve felt a need to go back. The sheer size of the structure is impressive, 36 rooms to sleep in, a chapel, bar/club, ice slide, gallery, and a cafe. Ceilings in the main hallways were about 20ft tall and temperatures never stray from the mid 20’s (regardless of outside temps). The Ice Hotel now has it’s own special location, a mere 10 minutes from downtown Quebec City. Each year’s incarnation is open from January – March.
They change the design of the rooms each year, asking artists to work their magic.
As always, these (and many more) photos of Quebec City and the Ice Hotel are available for purchase digitally or as framed prints through my stock photostore.

The Old City with the giant Chateau Frontenac towering over it.

One of the many horse drawn carriages.

Le Chateau Frontenac

Miriam enjoying the sun and snow.

Ice skating outside the Palais Montcalm.

The Ice Hotel Chapel’s front door

The alter inside the chapel.

Great details on the ‘stained ice’ windows and columns.


It took some time to push past the tour groups, but they finally thinned out.
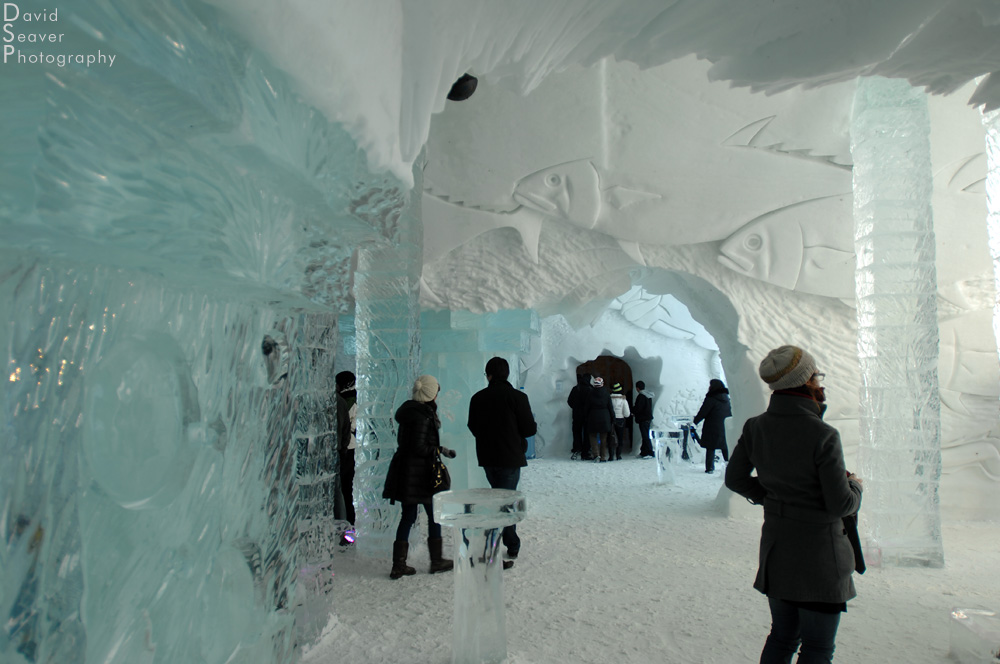
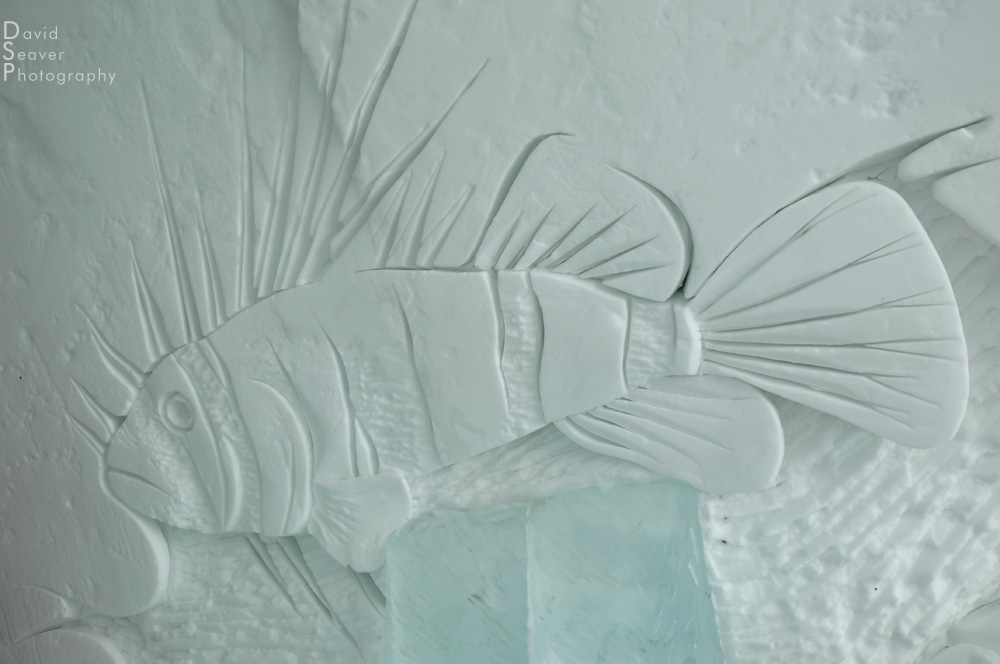
Inside the bar/club. There was an under the sea theme throughout.


The door to the main gallery at sunset.

A basic double room

Themed room.

The gas fireplace is just for show. It’s insulated so that heat doesn’t escape and melt the room.

The chandelier in the main gallery.

Seating and wall.

Seating in the cafe.

The cafe

Inside the roots of a tree.


Gingerbread candy house.

The largest of the suites, this one had it’s own hot tub (outside the door)


After the sun set, the lights created a very psychedelic feel in the club.

Deer skins keep you from melting the ice when you sit.


Electrical outlets are throughout the hotel.

Chandelier

An ice shot glass with delicious maple whiskey


Sliding down the ice slide


I can’t wait to see what they do next year!
